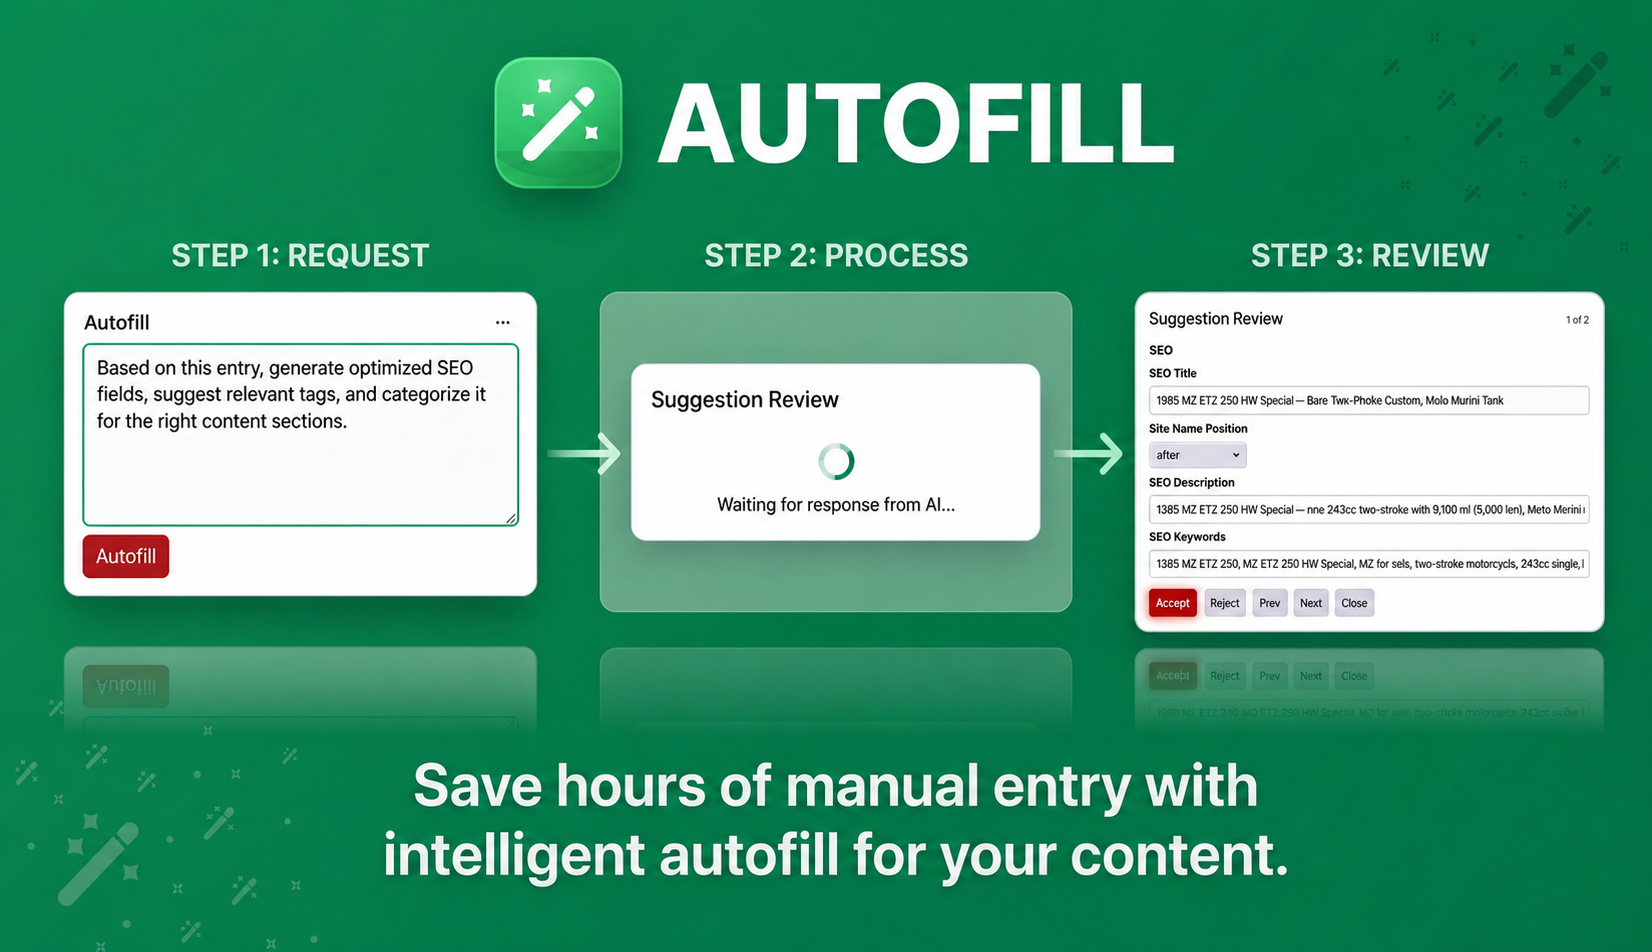
Save hours of manual entry with intelligent autofill for your content.
Paste text, images, or mixed content into a single input, and Autofill will automatically populate your entry fields based on customizable prompts. Define how each field should be filled—or whether it should be filled at all—and let the system handle the heavy lifting.
Review suggestions field-by-field with simple accept, reject, or edit controls, giving you full control while dramatically speeding up your workflow.
Overview & Getting Started
Autofill helps editors turn text-based notes, product details, briefs, or source copy into complete Craft entries. Add an Autofill field to an entry type, configure the fields it should populate, and editors can generate structured suggestions directly from the entry edit screen.
The plugin is designed around reviewable AI output. Autofill builds a structured prompt from your field configuration, asks the selected AI model for JSON suggestions, normalizes those suggestions for Craft fields, and lets editors review values before applying them.
A typical setup has three parts: a global AI model configuration, an Autofill field attached to an entry type, and generation rows that tell Autofill which fields to fill.
Requirements
Autofill requires Craft CMS 5.0.0 or later and PHP 8.2 or later.
The current provider integration uses OpenAI, so you will also need an OpenAI API key available to Craft through an environment variable.
Installation
Install Autofill from the Craft Plugin Store or require it with Composer, then install the plugin with the autofill plugin handle.
Most sites can think about Autofill setup in three parts: connect an AI model, create an Autofill field with prompts, then let editors generate and review suggestions.
1. Set up an AI model
Add your OpenAI API key to the environment, then create an enabled model configuration in Autofill settings. This gives Autofill a model to use when generating suggestions.
2. Set up an Autofill field with prompts
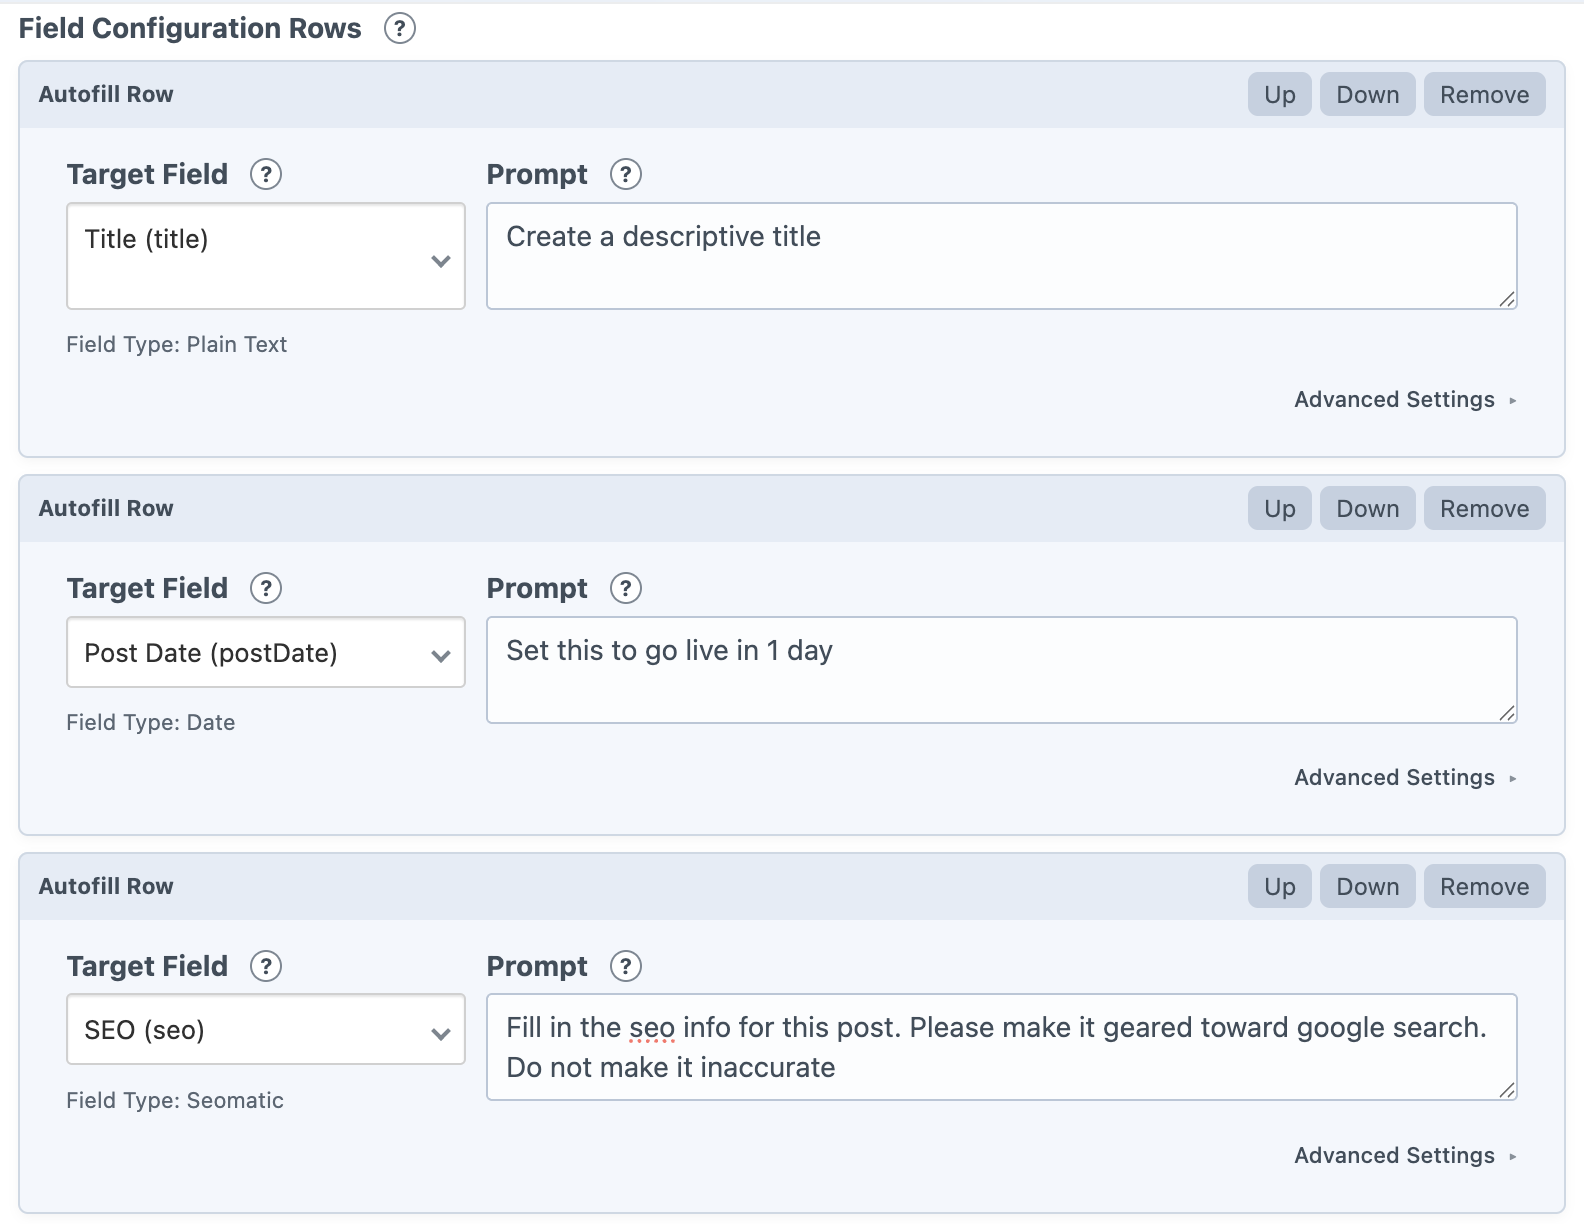
Create an Autofill field, choose the entry type it belongs to, and add generation rows for the fields Autofill should populate. Each row targets one field and includes the prompt that explains what should be generated.
You can also add a global prompt for shared guidance, such as tone, brand rules, formatting expectations, or SEO direction.
3. Let editors Autofill entries
Once the field is added to an entry layout, editors can enter text-based source material, click the Autofill action, review the generated suggestions, make edits if needed, and apply the values back to the entry.
Autofill suggestions are applied server-side, so the entry must already exist before generated values can be saved back to it.
AI Model Configuration
Autofill model configurations live in the plugin settings. These rows tell Autofill which provider, API key, model, and reasoning effort to use when generating suggestions.
You can create multiple model configurations for different editorial workflows. For example, one field can use a fast drafting model while another uses a more careful model for long-form or structured content.
Model Config Rows
Each model config row includes an internal label, provider, API key environment variable, model ID, optional reasoning effort, and enabled state.
The first enabled row is used as the default model configuration. Individual Autofill fields can either use that default or select a specific model config.
API Key Environment Variables
Store API keys as environment variables and reference them in the API Key Env column, for example $OPENAI_API_KEY. Autofill resolves the environment variable on the server before making requests.
This keeps secrets out of project config and avoids exposing keys to editors in the control panel.
Model IDs and Reasoning
The Model ID controls which OpenAI model Autofill uses. When the model list can be loaded from OpenAI, the settings page shows available models; otherwise, you can enter a model ID manually.
Reasoning effort can be left at the default or set to Low, Medium, or High for models that support reasoning controls.
Test Mode
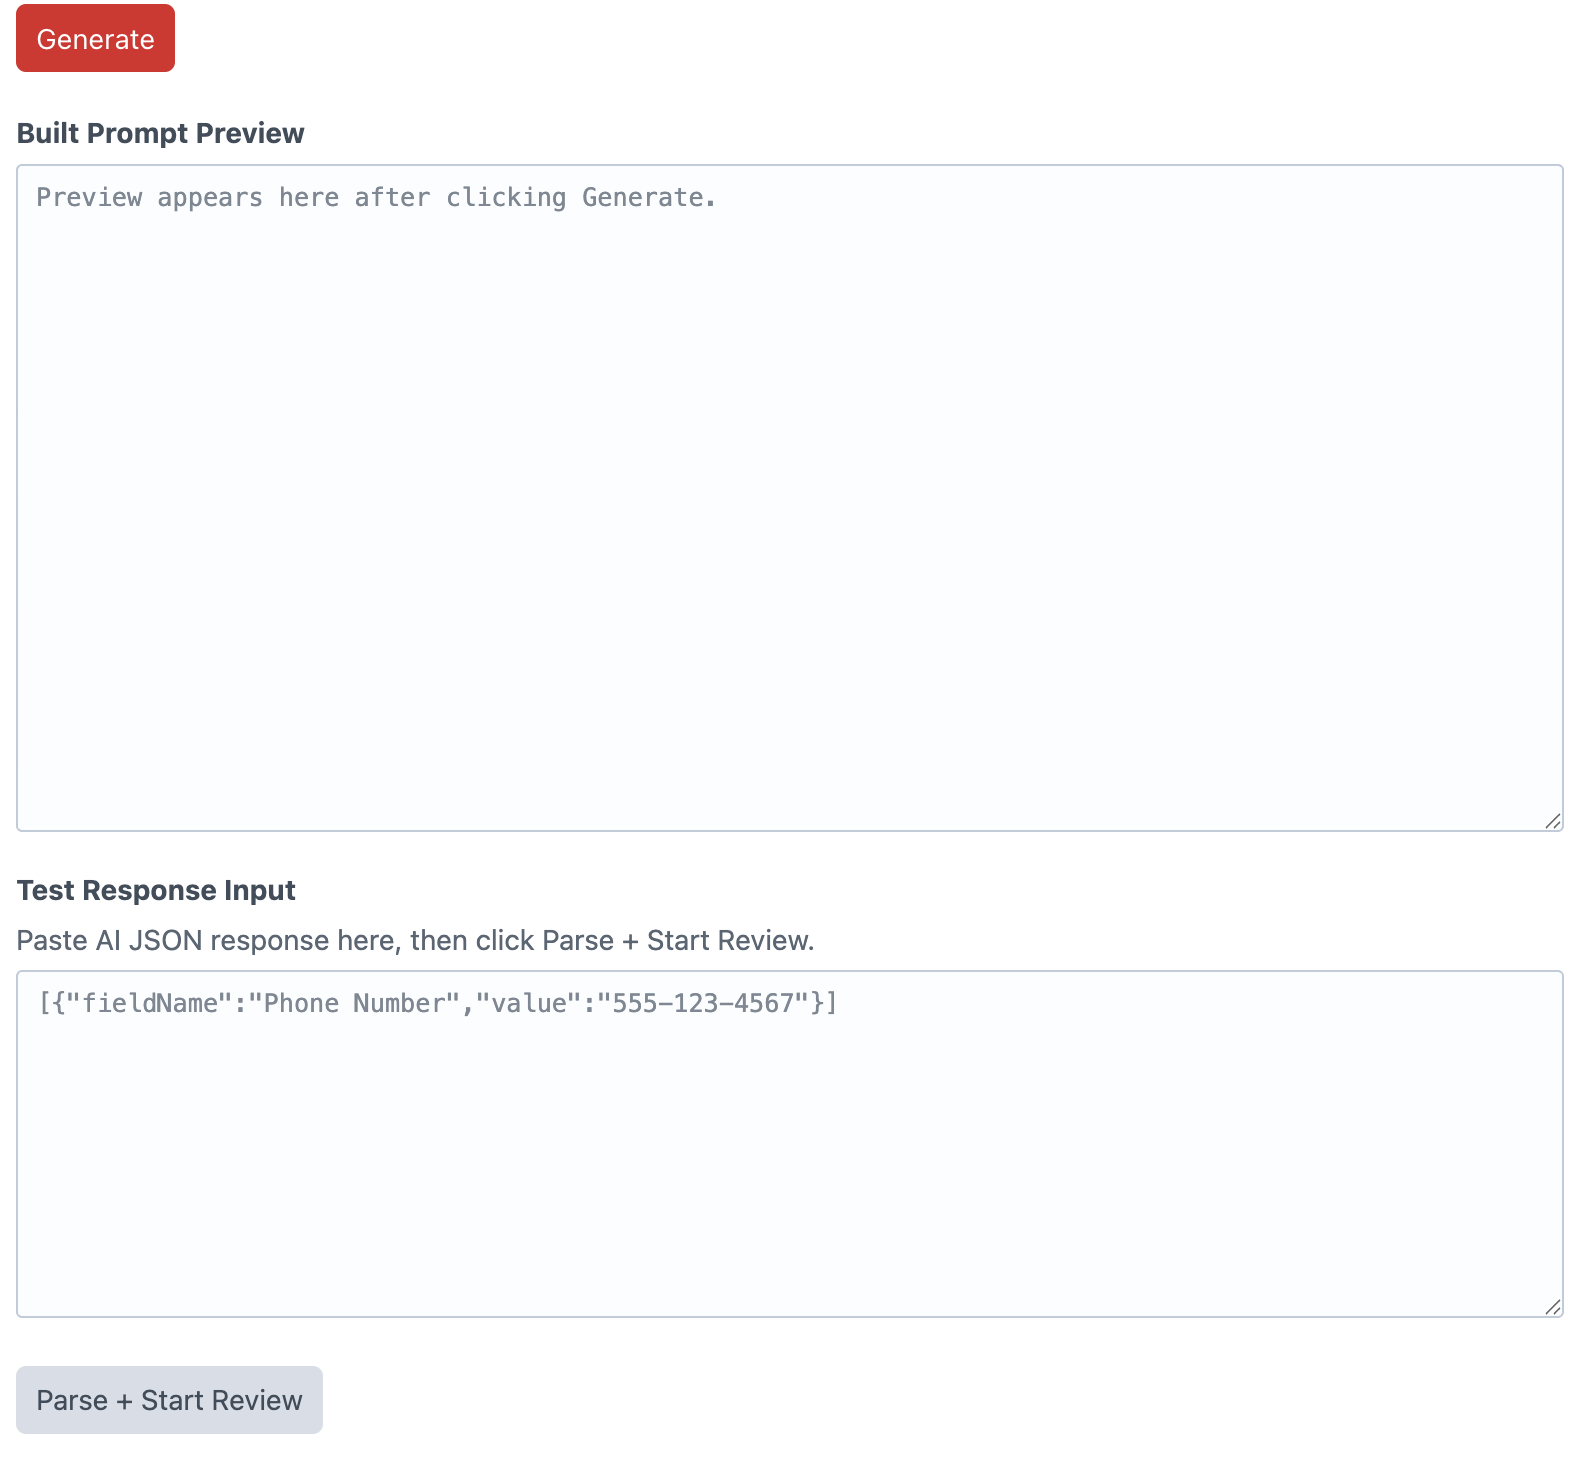
When Test Mode is enabled, editors can generate a prompt preview and manually paste a JSON response for parsing. This is useful for checking prompts, response shape, and review behavior without spending live API calls.
When Test Mode is disabled, the Autofill button sends a live AI request and opens the suggestion review flow.
Autofill Fields
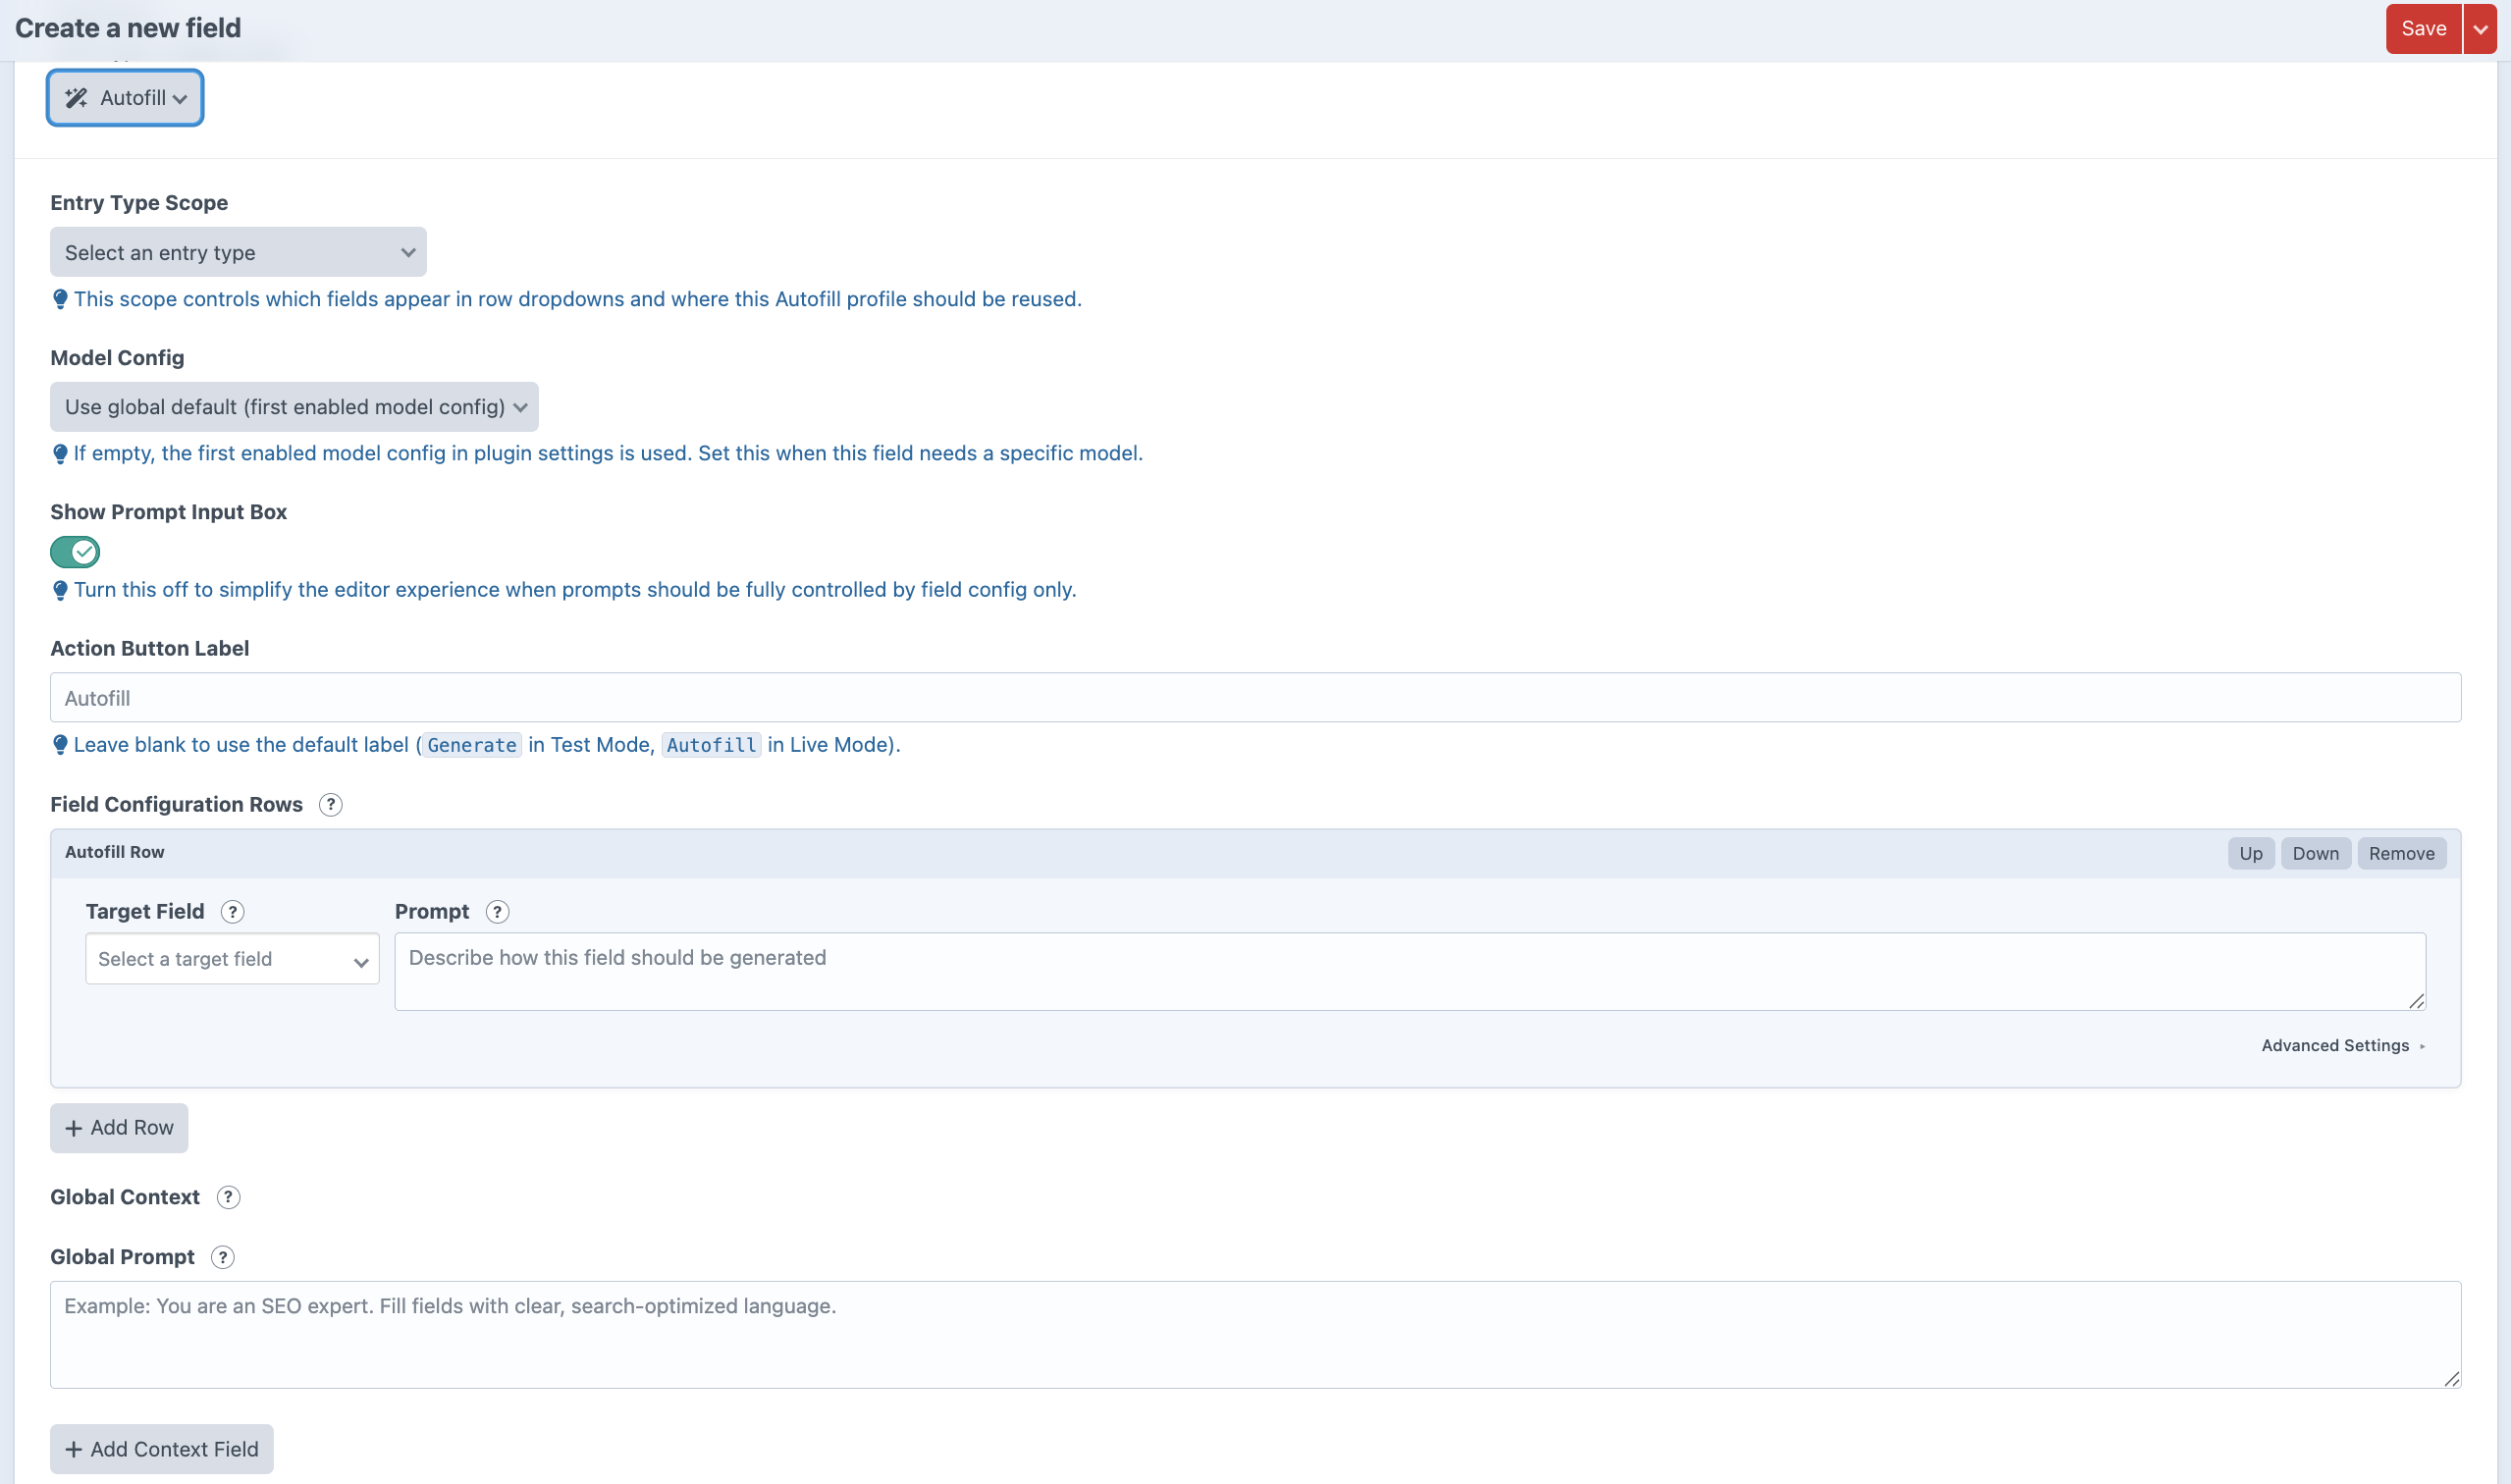
An Autofill field is the reusable profile that controls what editors can generate from an entry edit screen. It connects an entry type, an optional model configuration, shared instructions, and one or more generation rows.
Most projects will create one Autofill field per editorial workflow. For example, a product entry type might have one Autofill field that drafts product summaries, SEO text, and structured details from text-based source notes.
Entry Type Scope
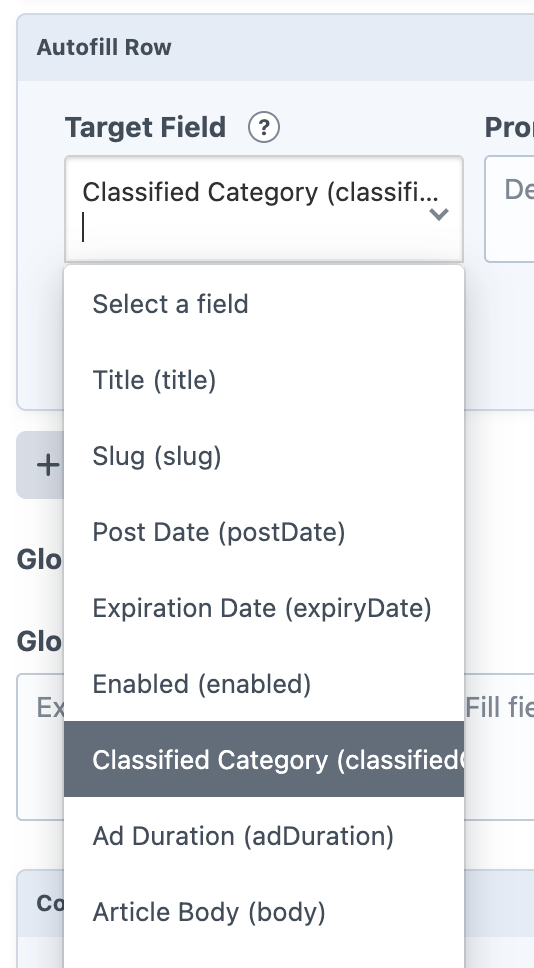
The entry type scope tells Autofill which entry type this field is designed for. Once selected, Autofill can show supported native and custom fields from that entry type in the target field and context field dropdowns.
Native entry fields include Title, Slug, Post Date, Expiration Date, and Enabled. Supported custom fields appear based on the adapters available in Autofill.
Model and Editor Controls
Each Autofill field can use the global default model configuration or choose a specific enabled model config. Leave the field setting blank when the first enabled model config should be used.
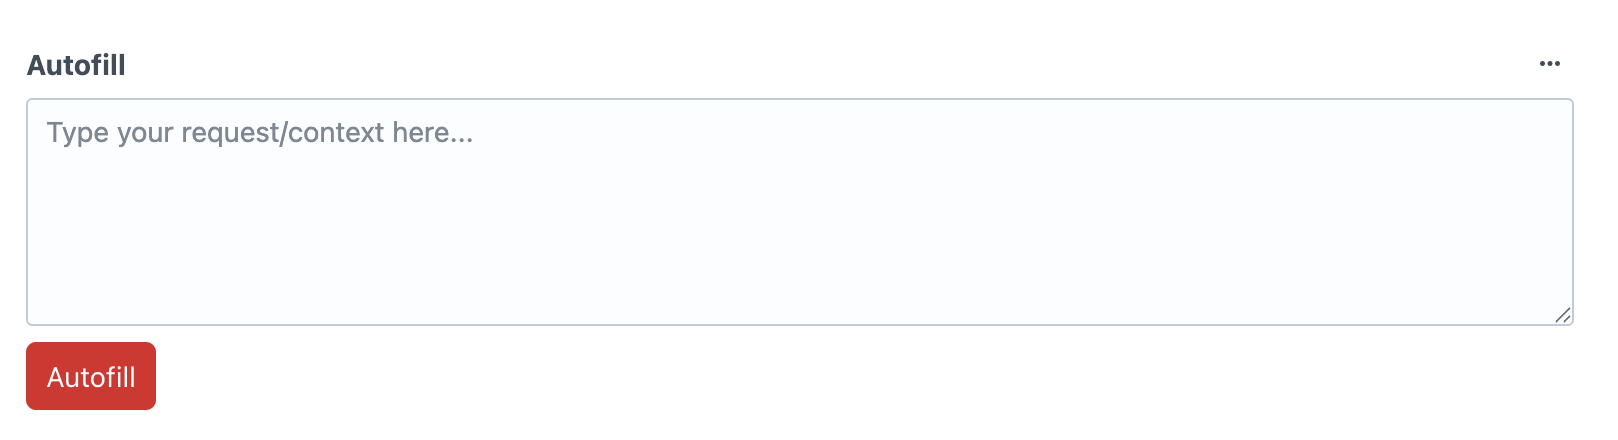
The Show Prompt Input Box setting controls whether editors see a prompt textarea on the entry edit screen. Turn it off when the field configuration should fully control the prompt and editors should only click the action button.
The Action Button Label lets you customize the button text. If left blank, Autofill uses Generate in Test Mode and Autofill in Live Mode.
Generation Rows
Generation rows are the heart of an Autofill field. Each row targets one field and gives AI a field-specific instruction. Rows run in order and should be written as clear, direct prompts.
A simple product entry might have one row for a short summary, one row for SEO title, and one row for SEO description. Each prompt should explain only what that target field needs.
Global Context
Global Context gives Autofill shared guidance that applies to every generation row. It is a good place to capture the editorial rules that should stay consistent no matter which editor is working on an entry.
Use the Global Prompt for broad instructions such as brand voice, formatting rules, audience, SEO guidance, compliance requirements, or field-writing standards. This can help newer editors understand how specific fields should be approached and gives experienced editors a shared baseline to work from.
Context rows let you include existing field values as read-only reference material. Context fields are not updated by those rows; they simply help the model understand the entry and make better suggestions for the fields it is filling.
Advanced Row Settings
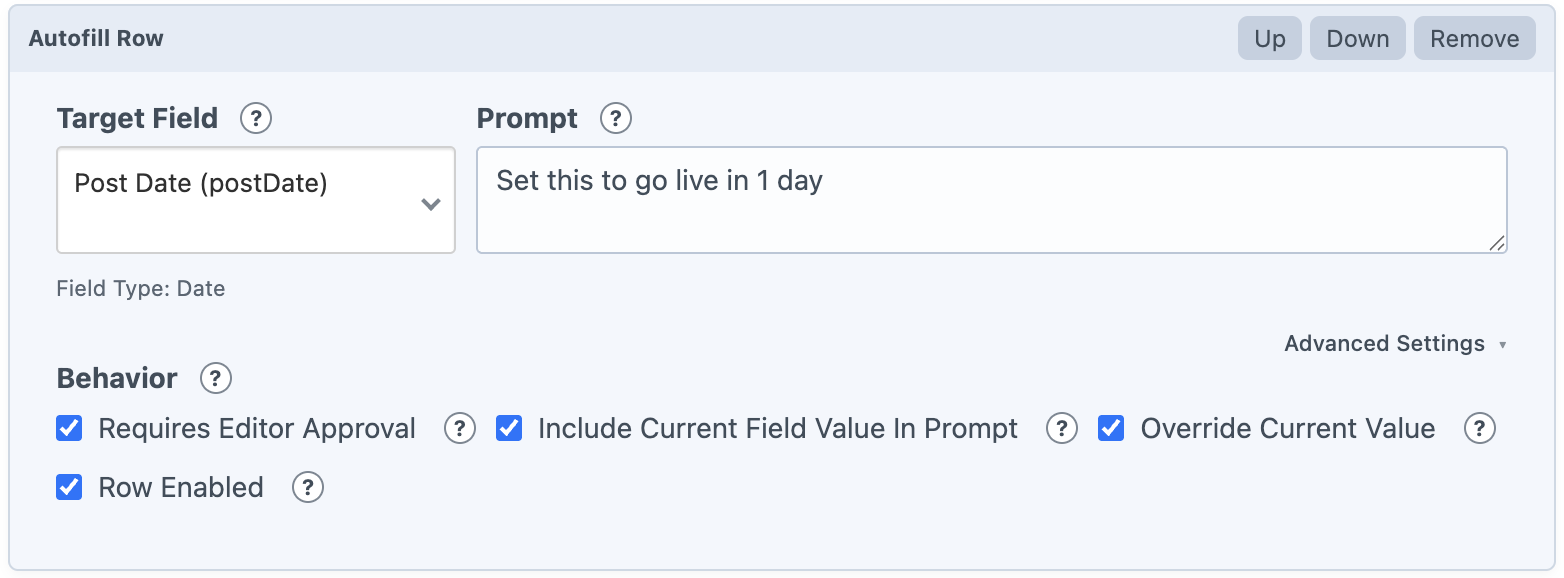
Each generation row includes advanced behavior switches:
Requires Editor Approval shows the suggestion in the review flow before it is applied.
Include Current Field Value In Prompt sends the field's current value as context so AI can refine or preserve existing content.
Override Current Value controls whether Autofill should replace fields that already have content. When disabled, populated fields are skipped.
Row Enabled lets you temporarily remove a row from generation without deleting its prompt.
Some field types add extra settings. Relationship fields can limit candidate lists, while SEOmatic fields can choose which SEO properties are included in the prompt contract.
SEO Fields
When an Autofill row targets a SEOmatic field, the advanced settings include a SEO Prompt Includes section. These options control which SEOmatic properties are included in the AI prompt and returned in the generated suggestion.
Include SEO Title + Source tells Autofill to generate the SEO title value and include the supporting source setting that SEOmatic uses for that title. Include Site Name Position + Source includes SEOmatic’s site name placement setting, such as whether the site name should appear before or after the title. Include SEO Description + Source includes the SEO description value and its source setting. Include SEO Keywords + Source includes the SEO keywords value and its source setting.
Disable any of these options when you only want Autofill to manage part of the SEOmatic field instead of asking AI to fill every supported SEO property.
Related Element Fields
Related element fields include fields such as Entries, Categories, and Tags. These fields can have many possible values, so Autofill includes a Related Selection Scope setting to control how many possible options are sent to AI.
Mode controls whether AI can choose from a limited shortlist or from all available related elements. Top N sends only a smaller ranked list of candidates, which keeps prompts shorter and usually makes responses faster and more focused. All sends the full candidate list, which can be useful for small sites or tightly scoped fields, but may create larger prompts when many entries, tags, or categories exist.
Top N controls the size of the shortlist when Mode is set to Top N. For example, a value of 25 means Autofill will send up to 25 candidate items for AI to choose from.
Link Fields
Link fields include a Link Candidate Scope section. This controls which element candidates are sent to AI when the Link field supports links to entries, categories, or assets.
Each supported link target type has its own settings for Entries, Categories, and Assets. Mode controls how candidates are selected. Top N sends a limited shortlist. Most Recent sends recent candidates. All sends every candidate for that link type. None prevents candidates for that link type from being included.
Count controls how many candidates are sent when the mode uses a limited list, such as Top N or Most Recent. Text-based link types do not use candidate lists, so these settings are mainly useful when the Link field can point to Craft elements.
Editor Workflow
Editors use Autofill directly from the entry edit screen. The field gives them a focused way to turn text-based source material into structured field suggestions without leaving the entry.
The basic workflow is simple: add any needed source material, click the Autofill action, review the generated suggestions, then apply the values that should be saved to the entry.
Workflow With a Prompt Box
When the prompt box is shown, editors can add notes, instructions, source copy, product details, or other text-based context before clicking the Autofill action.
This is useful when the editor has new information that is not already stored on the entry, or when they need to steer the generated suggestions for a specific update.
Workflow Without a Prompt Box
When the prompt box is hidden, the editor experience is even simpler. Editors click the Autofill action and rely on the field configuration, global prompt, context rows, and existing entry values to guide generation.
This works well for repeatable workflows where admins want tighter control over how fields are filled and do not want editors writing their own instructions.
Reviewing Suggestions
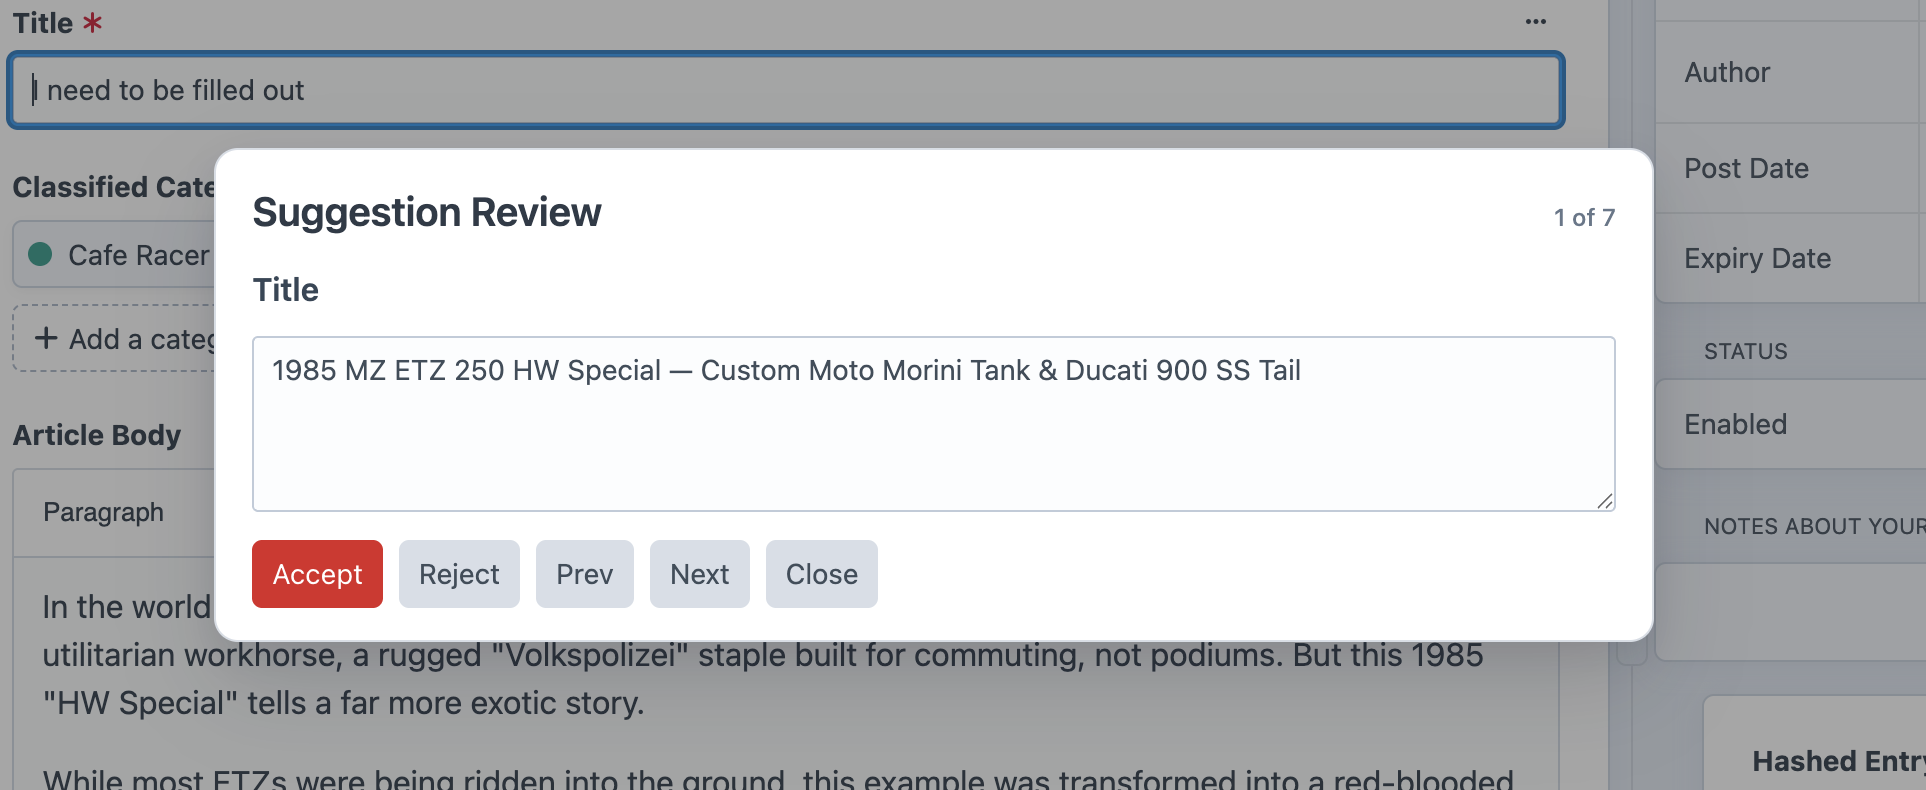
The review modal shows generated suggestions one at a time. Each suggestion is rendered with an editor that matches the target field type as closely as possible, so editors can adjust values before applying them.
Rows marked as requiring approval appear in the review flow. This gives editors a chance to confirm the content, make small edits, or skip values that are not right for the entry.
Applying Suggestions
Suggestions are applied server-side and saved back to the entry. Because of that, the entry must already exist before generated values can be applied.
If an entry has not been saved yet, save it first, then run Autofill again. This gives Autofill an entry ID to update when suggestions are accepted.
Supported Fields
Autofill uses field adapters to understand Craft fields, build useful prompt instructions, normalize AI responses, and apply generated values back to entries.
Supported fields appear in the target field and context field dropdowns after you choose an entry type scope for the Autofill field.
Native Entry Fields
Title
Slug
Post Date
Expiration Date
Enabled
Supported Fields
Plain Text
Lightswitch
Number
Date
Time
Dropdown
Checkboxes
Multi-select
Radio Buttons
Color
Country
Button Group
Icon
JSON
Range
Money
Email
CKEditor
SEOmatic
Addresses (Pro edition only)
Links (Pro edition only)
Tables (Pro edition only)
Categories (Pro edition only)
Tags (Pro edition only)
Entries (Pro edition only)
For relationship-style Pro fields, Autofill can include candidate options in the prompt so the model can suggest matching related elements. Some field types include extra settings to keep those candidate lists focused.
Lite vs Pro Edition
Autofill is available in Lite and Pro editions. The core workflow is the same in both editions: configure an AI model, create an Autofill field, add prompts, and let editors generate reviewable field suggestions.
Lite Edition
The Lite edition is intended for focused workflows and smaller setups.
One Autofill field
AI model configuration
Editor-facing Autofill workflow
Prompt box and no-prompt-box field workflows
Support for native entry fields
Support for common scalar, choice, date, content, SEO, and utility fields
Pro Edition
Autofill Pro is for larger editorial workflows, automation, and richer field layouts.
Unlimited Autofill fields
Access to the Autofill console endpoint allowing bulk calls
Everything included in the Lite edition
Additional supported field types: Addresses, Links, Tables, Categories, Tags, and Entries
Choosing an Edition
Use the Lite edition when you need one Autofill workflow for a single entry type or focused use case. Or if you just want to try out the plugins core functionality to see if it actually improves productivity. Use Pro when you need multiple Autofill fields, relationship-style fields, richer field support, or API access.
Bulk Autofill
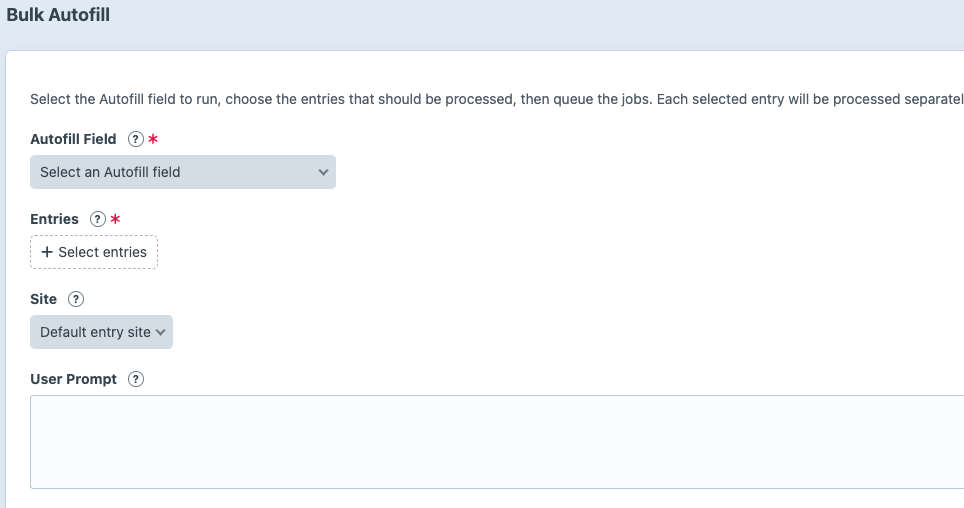
Autofill Pro includes a console workflow, control panel page, and extensible queue service for running an Autofill field across one or more existing entries. This is useful when you want to backfill content, refresh generated fields, or apply the same Autofill profile to a batch of entries.
Bulk Autofill uses the same field configuration, model configuration, prompts, and field adapters as the editor workflow. The important difference is that bulk runs apply normalized suggestions automatically, so it should be used carefully.
Bulk Calls from Control Panel
You can call on as many entries as you would like right from the craft control panel. Just pick the Autofill field you would like to call and the entries you would like to call it on to run an individual job for each. You can also optionally add a prompt to be passed to those runs as well as the site id for multi site support
You can identify the Autofill field by field handle or field ID:
--field-slug: the Autofill field handle
--field-id: the Autofill field ID
Options
--entry-ids: comma-separated entry IDs to process
--site-id: optional site ID
--user-prompt: optional text-based input to include in the generated prompt
What Happens
For each entry, Autofill builds the prompt, sends the request to the selected model, normalizes the generated suggestions, applies each suggestion to the entry, and saves the entry.
Because bulk runs do not pause for editor review, test the Autofill field on a small number of entries first. Use Test Mode and request logs to confirm the prompts and responses look right before running a larger batch.
Queue Service Extension
If you would like to extend autofill and call on a fields functionality in a more extensible way the service can be called from other plugins. For one of the sites I manage for example, it was desirable to call an autofill field after and entry is saved and enabled for the first time. This seemed quite niche to the sites that I work on so it was not added to the core plugin functionality. However it the sites you work with have a niche requirement, accessing the fields looks like this:
// Save Autofill plugin into variable.
$autofill = Craft::$app->getPlugins()->getPlugin('autofill');

// Stop if Autofill is not installed or enabled.
if (!$autofill || !method_exists($autofill, 'getBulkAutofillService')) {
    return;
}

// Get the bulk service into a variable.
$bulkAutofillService = $autofill->getBulkAutofillService();

// Queue a job for a specific Autofill field.
try {
    $bulkAutofillService->queueForEntry(
        $fieldId, // The field ID of the specific Autofill field.
        null, // Optional field handle/slug. Use null when passing a field ID.
        (int)$entry->id, // An entry ID with that field.
        (int)$entry->siteId, // Site ID.
        '', // Optional user prompt.
        'my-plugin' // Source label for logs/debugging.
    );
} catch (\Throwable $exception) {
    Craft::warning(sprintf(
        'Could not queue Autofill field %d for entry %d: %s',
        $fieldId,
        (int)$entry->id,
        $exception->getMessage()
    ), __METHOD__);
}
Test Mode
Test Mode is a debugging tool for admins and implementers. It helps you see what Autofill is sending to AI and how Autofill handles the response before you rely on the live editor workflow.
Use Test Mode when a field is not generating the kind of suggestions you expect, when you are tuning prompts, or when you want to understand how context fields and current entry values are included.
Prompt Preview
In Test Mode, clicking Generate builds the prompt preview instead of sending a live AI request. The preview shows the global prompt, editor input, context fields, generation rows, field contracts, and expected response format.
This is useful when you want to confirm that the model is receiving the right instructions and enough context to fill the configured fields.
Prompt Writing Tips
Autofill works best when the field prompts are specific. The model needs clear instructions about what each field is for, what style to use, and what kind of value should be returned.
Use the Global Prompt for shared rules like brand voice, audience, formatting, compliance guidance, or SEO direction.
Keep generation row prompts focused on one field at a time.
Tell the model what good output looks like: length, tone, format, allowed values, or examples.
Use context rows for source-of-truth fields that should guide the generated values.
Use Test Mode when a prompt is unclear, too broad, or producing inconsistent results.
If a generated result is not useful, the prompt preview is usually the best first place to look. It shows whether Autofill is giving the model enough context and whether the row instructions are clear enough for the field being filled.
Testing a Response
Test Mode includes a response input where you can paste JSON and click Parse + Start Review. This lets you test whether Autofill can match fields, normalize values, and open the review flow with the response shape you expect.
The response should be valid JSON, either as a suggestions array or as an object with a suggestions or result array. Each suggestion should include a fieldName and value.
When to Use Test Mode
Checking what prompt Autofill sends to AI
Tuning global prompts or row prompts
Confirming context fields are included correctly
Debugging unexpected or invalid AI responses
Testing field matching and review behavior without making live generation part of the editor workflow
Test Mode is not meant to be the everyday editor experience. Once setup is working, disable Test Mode so editors see the normal Autofill workflow.
Request Logs
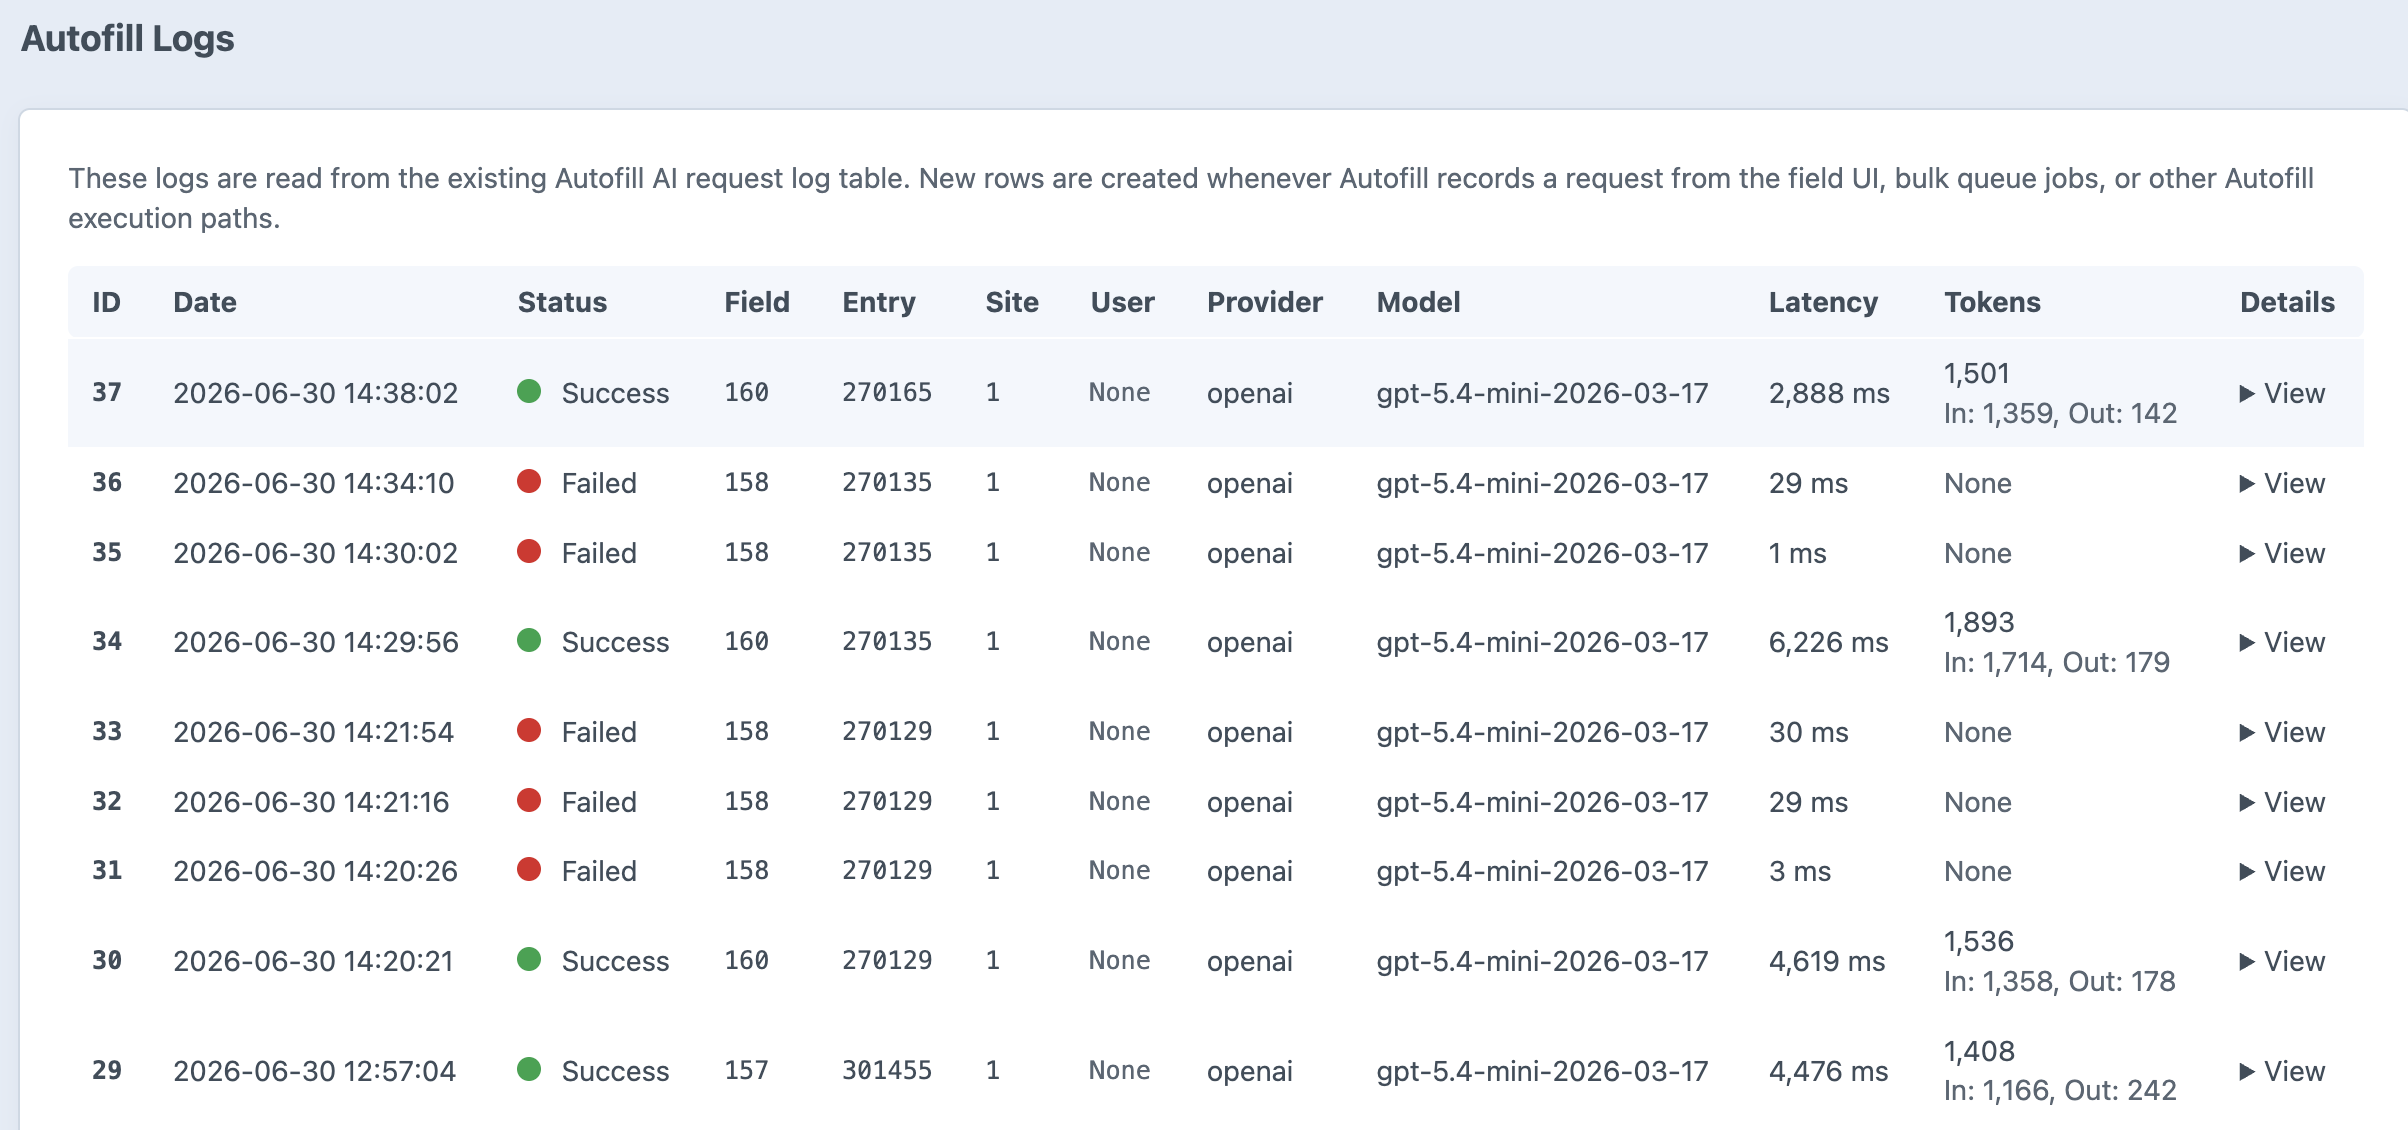
Autofill records AI request details so admins and developers can understand what happened during a generation run. Request logs are useful when you need to compare prompts, inspect responses, understand failures, or review token usage and latency.
What Gets Logged
Autofill field ID
Entry ID and site ID, when available
User ID, when the request comes from a logged-in editor
Provider and model configuration
Model ID and reasoning effort
Generated request prompt
Request and response payload details
Raw response text
Success or failure state
Error message, when available
Latency and token usage
Provider response ID
When to Check Logs
Check request logs when a generation fails, when the model returns unexpected values, when you need to tune prompts, or before running a larger Bulk Autofill job.
Logs are especially helpful alongside Test Mode: Test Mode shows what would be sent, while request logs show what was actually sent and returned during real generation.
Where to Check Logs
Logs are available in the craft admin page under 'Logs'